让你的网站变成一个Android应用
2023/1/30约 935 字大约 3 分钟
TWA (Trusted Web Activity 可信任的网络应用) 即: 基于 Chrome Custom Tabs,利用谷歌浏览器提供的 api,实现强大功能的桌面应用技术。我们可以通过这个把你的网站变成应用。
但是在这之前,你需要准备一些东西,包括
- 一个支持PWA的网站
- Android Studio
本文参照 TWA 踩坑记-从零到一让你的博客变成 app 并上架商店 编写,由于版本更迭的原因,原教程的方法已经不再完全可用。感谢 Harbor Zeng 老师的思路。
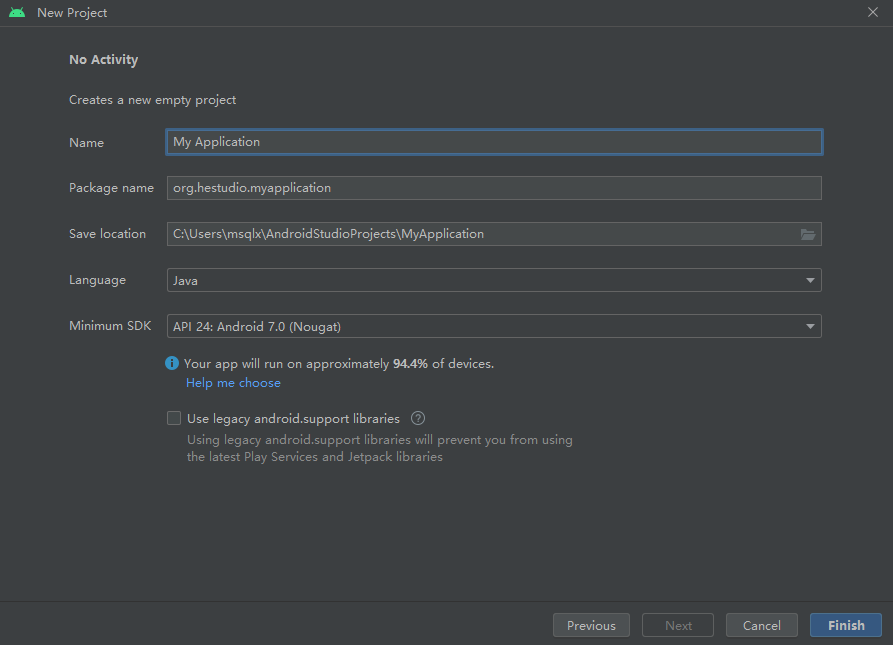
创建项目
- 打开 Android Studio
- 创建项目
- 选择 No Activity,稍后引入的库会包含一个 activity。
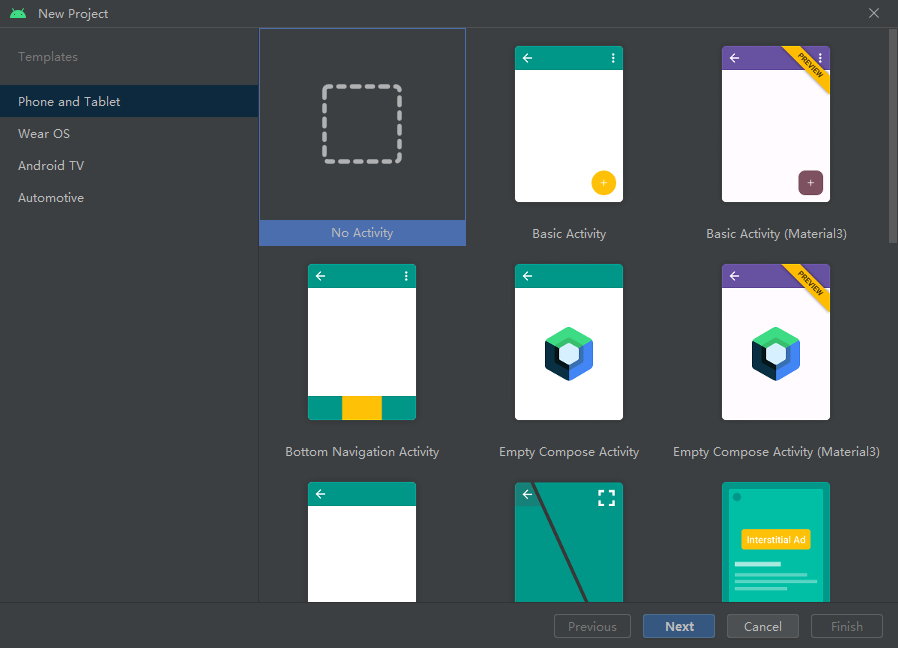
- 填写信息,并注意 API 需要大于 19
设置仓库
首先我们需要设置仓库。打开 project 目录的settings.gradle,然后参考这样设置。
pluginManagement {
    repositories {
        google()
        mavenCentral()
        gradlePluginPortal()
    }
}
dependencyResolutionManagement {
    repositoriesMode.set(RepositoriesMode.FAIL_ON_PROJECT_REPOS)
    repositories {
        google()
        jcenter()
        mavenCentral()
        maven { url "https://jitpack.io" }
    }
}
rootProject.name = "heStudio Blog" // 自己的软件名称
include ':app'
然后打开 app 目录的build.gradle,设置 Java8,这个库依赖 Java8
compileOptions {
    sourceCompatibility JavaVersion.VERSION_1_8
    targetCompatibility JavaVersion.VERSION_1_8
}
并添加这个库
dependencies {
    implementation 'com.github.GoogleChrome.custom-tabs-client:customtabs:d08e93fce3'
}
在保存文件后 Android Studio 会提醒你是否 Sync,这时开始同步。
添加 activity
<?xml version="1.0" encoding="utf-8"?>
<manifest xmlns:android="http://schemas.android.com/apk/res/android"
    xmlns:tools="http://schemas.android.com/tools">

    <application
        android:allowBackup="true"
        android:dataExtractionRules="@xml/data_extraction_rules"
        android:fullBackupContent="@xml/backup_rules"
        android:icon="@mipmap/ic_launcher"
        android:label="@string/app_name"
        android:supportsRtl="true"
        android:theme="@style/Theme.HeStudioBlog"
        tools:targetApi="31" >

        <meta-data
            android:name="asset_statements"
            android:resource="@string/asset_statements" />

        <activity android:name="android.support.customtabs.trusted.LauncherActivity"
            android:exported="true">

            <!-- Edit android:value to change the url opened by the TWA -->
            <meta-data
                android:name="android.support.customtabs.trusted.DEFAULT_URL"
                android:value="https://www.hestudio.net" />

            <!-- This intent-filter adds the TWA to the Android Launcher -->
            <intent-filter>
                <action android:name="android.intent.action.MAIN" />
                <category android:name="android.intent.category.LAUNCHER" />
            </intent-filter>

            <!--
              This intent-filter allows the TWA to handle Intents to open
              hestudio.net.
            -->
            <intent-filter android:autoVerify="true">
                <action android:name="android.intent.action.VIEW" />

                <category android:name="android.intent.category.DEFAULT" />
                <category android:name="android.intent.category.BROWSABLE" />

                <!-- Edit android:host to handle links to the target URL-->
                <data
                    android:host="hestudio.net"
                    android:scheme="https" />
            </intent-filter>
        </activity>
    </application>

</manifest>
把上面的网站地址和域名都换成你自己的。
链接到网站
我们需要将应用链接到网站以进一步取消地址栏。我们就需要分别设置网站验证 APP 和 APP 验证网站。
APP 到网页的认证
打开/app/src/main/res/values/strings.xml,插入以下代码
<resources>
    <string name="app_name">heStudio Blog</string>
    <string name="asset_statements">
        [{
            \"relation\": [\"delegate_permission/common.handle_all_urls\"],
            \"target\": {
                \"namespace\": \"web\",
                \"site\": \"https://www.hestudio.net\"}
        }]
    </string>
</resources>
将 site 的网址改成自己的,然后再返回到AndfoidManifest.xml,在activity前面插入meta-data
<?xml version="1.0" encoding="utf-8"?>
<manifest xmlns:android="http://schemas.android.com/apk/res/android"
    xmlns:tools="http://schemas.android.com/tools">

    <application
        android:allowBackup="true"
        android:dataExtractionRules="@xml/data_extraction_rules"
        android:fullBackupContent="@xml/backup_rules"
        android:icon="@mipmap/ic_launcher"
        android:label="@string/app_name"
        android:supportsRtl="true"
        android:theme="@style/Theme.HeStudioBlog"
        tools:targetApi="31" >

        <meta-data
            android:name="asset_statements"
            android:resource="@string/asset_statements" />

        <activity android:name="android.support.customtabs.trusted.LauncherActivity"
            android:exported="true">

            <!-- Edit android:value to change the url opened by the TWA -->
            <meta-data
                android:name="android.support.customtabs.trusted.DEFAULT_URL"
                android:value="https://www.hestudio.net" />

            <!-- This intent-filter adds the TWA to the Android Launcher -->
            <intent-filter>
                <action android:name="android.intent.action.MAIN" />
                <category android:name="android.intent.category.LAUNCHER" />
            </intent-filter>

            <!--
              This intent-filter allows the TWA to handle Intents to open
              hestudio.net.
            -->
            <intent-filter android:autoVerify="true">
                <action android:name="android.intent.action.VIEW" />

                <category android:name="android.intent.category.DEFAULT" />
                <category android:name="android.intent.category.BROWSABLE" />

                <!-- Edit android:host to handle links to the target URL-->
                <data
                    android:host="hestudio.net"
                    android:scheme="https" />
            </intent-filter>
        </activity>
    </application>

</manifest>
网页到 APP 的认证
你可以使用assetlinks.json验证程序是否合法。那么你需要准备一些东西,包括签名证书。
- 访问 https://developers.google.cn/digital-asset-links/tools/generator (大陆可以访问)并填写你的信息,并点击生成。
- 在网站的根目录新建
.well-known文件夹,并在里面新建assetlinks.json - 将生成的内容复制到这个文件里面。
最后,我们修改我们自己需要自定义的部分,经过测试后,打包后就可以发布使用。